

Construction stages
Series of 14 construction phases
(Click on the icon to start. The program will open in a new tab, feel free to read on while it loads)

Construction stages
(Opens in new tab, feel free to read more while the program loads)
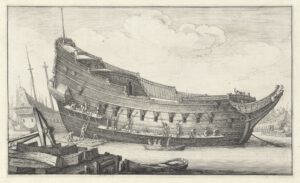
In "Aeloude en Hedendaegse Scheepsbouw en Bestier" Nicolaes Witsen described in detail in 1671 how Dutch shipbuilding went to work. This is one of the few surviving books on shipbuilding in the 17th century. In this module you go through the phases in which a ship was built step by step. Take the time to isolate and inspect parts of the ship.
In the Witsen Scheepsbouw program, this separate department has been incorporated to show how Dutch ships were built in the 17th century (and well beyond). To our 21-century eyes, it seems strange that construction was done without a pre-drawn design on paper. The construction sequence seems even more unusual: first the outer skin and only then the frames. How the shipbuilders achieved this is shown in a series of 14 construction phases, whereby the user is immediately interactively familiar with the names of the different parts, which can be shown or omitted at will.
-
It shows how the major work is carried out during the first ten phases: keel, stem, stern, planking, frames, deck beams and ceiling. In phase 11, the launch takes place shortly after the hull has been boarded up on the outside. The further completion will take place on the water. Phase 14 shows the ship in its completed state.
The 'shell-first' construction method is based on a system of rules of thumb, which were applicable to every part of the ship. Not only were the dimensions of the ship itself defined in this way (the width a quarter of the length, the depth in hold a tenth), the dimensions of the keel, stern, planking, frames, etc. were also subject to formulas. You can find these formulas in the Encyclopedia section.
Although there were drawbacks to this traditionally developed rule-of-thumb system, it proved to be extremely effective and inexpensive. An average vessel, such as the pinas traded here, took the yard no more than four to five months from tender to delivery. 20 to 22 people had worked on it, six days a week, from five in the morning to eight in the evening. We made good money on our yards. A craftsman earned 8 guilders a day in the summer, and 1,5 guilder in the winter when the days were shorter. A ship like the pinas of 1 feet cost the contracting authority ready and ready about 134 guilders, already a fortune at that time. Nevertheless, the Dutch shipyards were cheaper than others and both merchant and warships were constantly ordered and delivered from abroad.
The largest conglomeration of yards was found in the Zaan region, a few miles North of Amsterdam but elsewhere too there was hardly a place on the water where there were no shipyards.
Using the program is simple. If you want to take a closer look at a certain part of the ship, left-click on it with your mouse, you can then view the selected part in all positions by moving the mouse. You can also isolate a part from the rest by checking or omitting check marks, so that you know the name of the part. A distinction was made between parts of the ship and the tools that were needed at the yard to build the ship. You can also view or remove these at will. In order to be able to follow the construction inside the ship, you have the option to omit the port half.

Not suitable for mobile


